
How Do You Install Custom-Fit Car Seat Covers?
Start by confirming that the seat-cover set matches your exact vehicle and seat configuration. Lay out and identify every cover piece, install the front and rear sections in sequence, route the applicable straps and fasteners carefully, keep seat controls and safety-related areas clear, then check alignment and function after installation.
Because seat structures, split configurations, headrests, armrests, controls, and fastening points vary by vehicle, use the official EKR Installation Guide as your main step-by-step installation reference.
Start With the Official EKR Installation Guide
This blog explains the overall installation process and common points to check. When you are ready to begin, use the official EKR installation reference for common seat-cover components, fastening methods, positioning, and final fit checks.
View the Official Installation GuideConfirm the Vehicle and Seat Configuration First
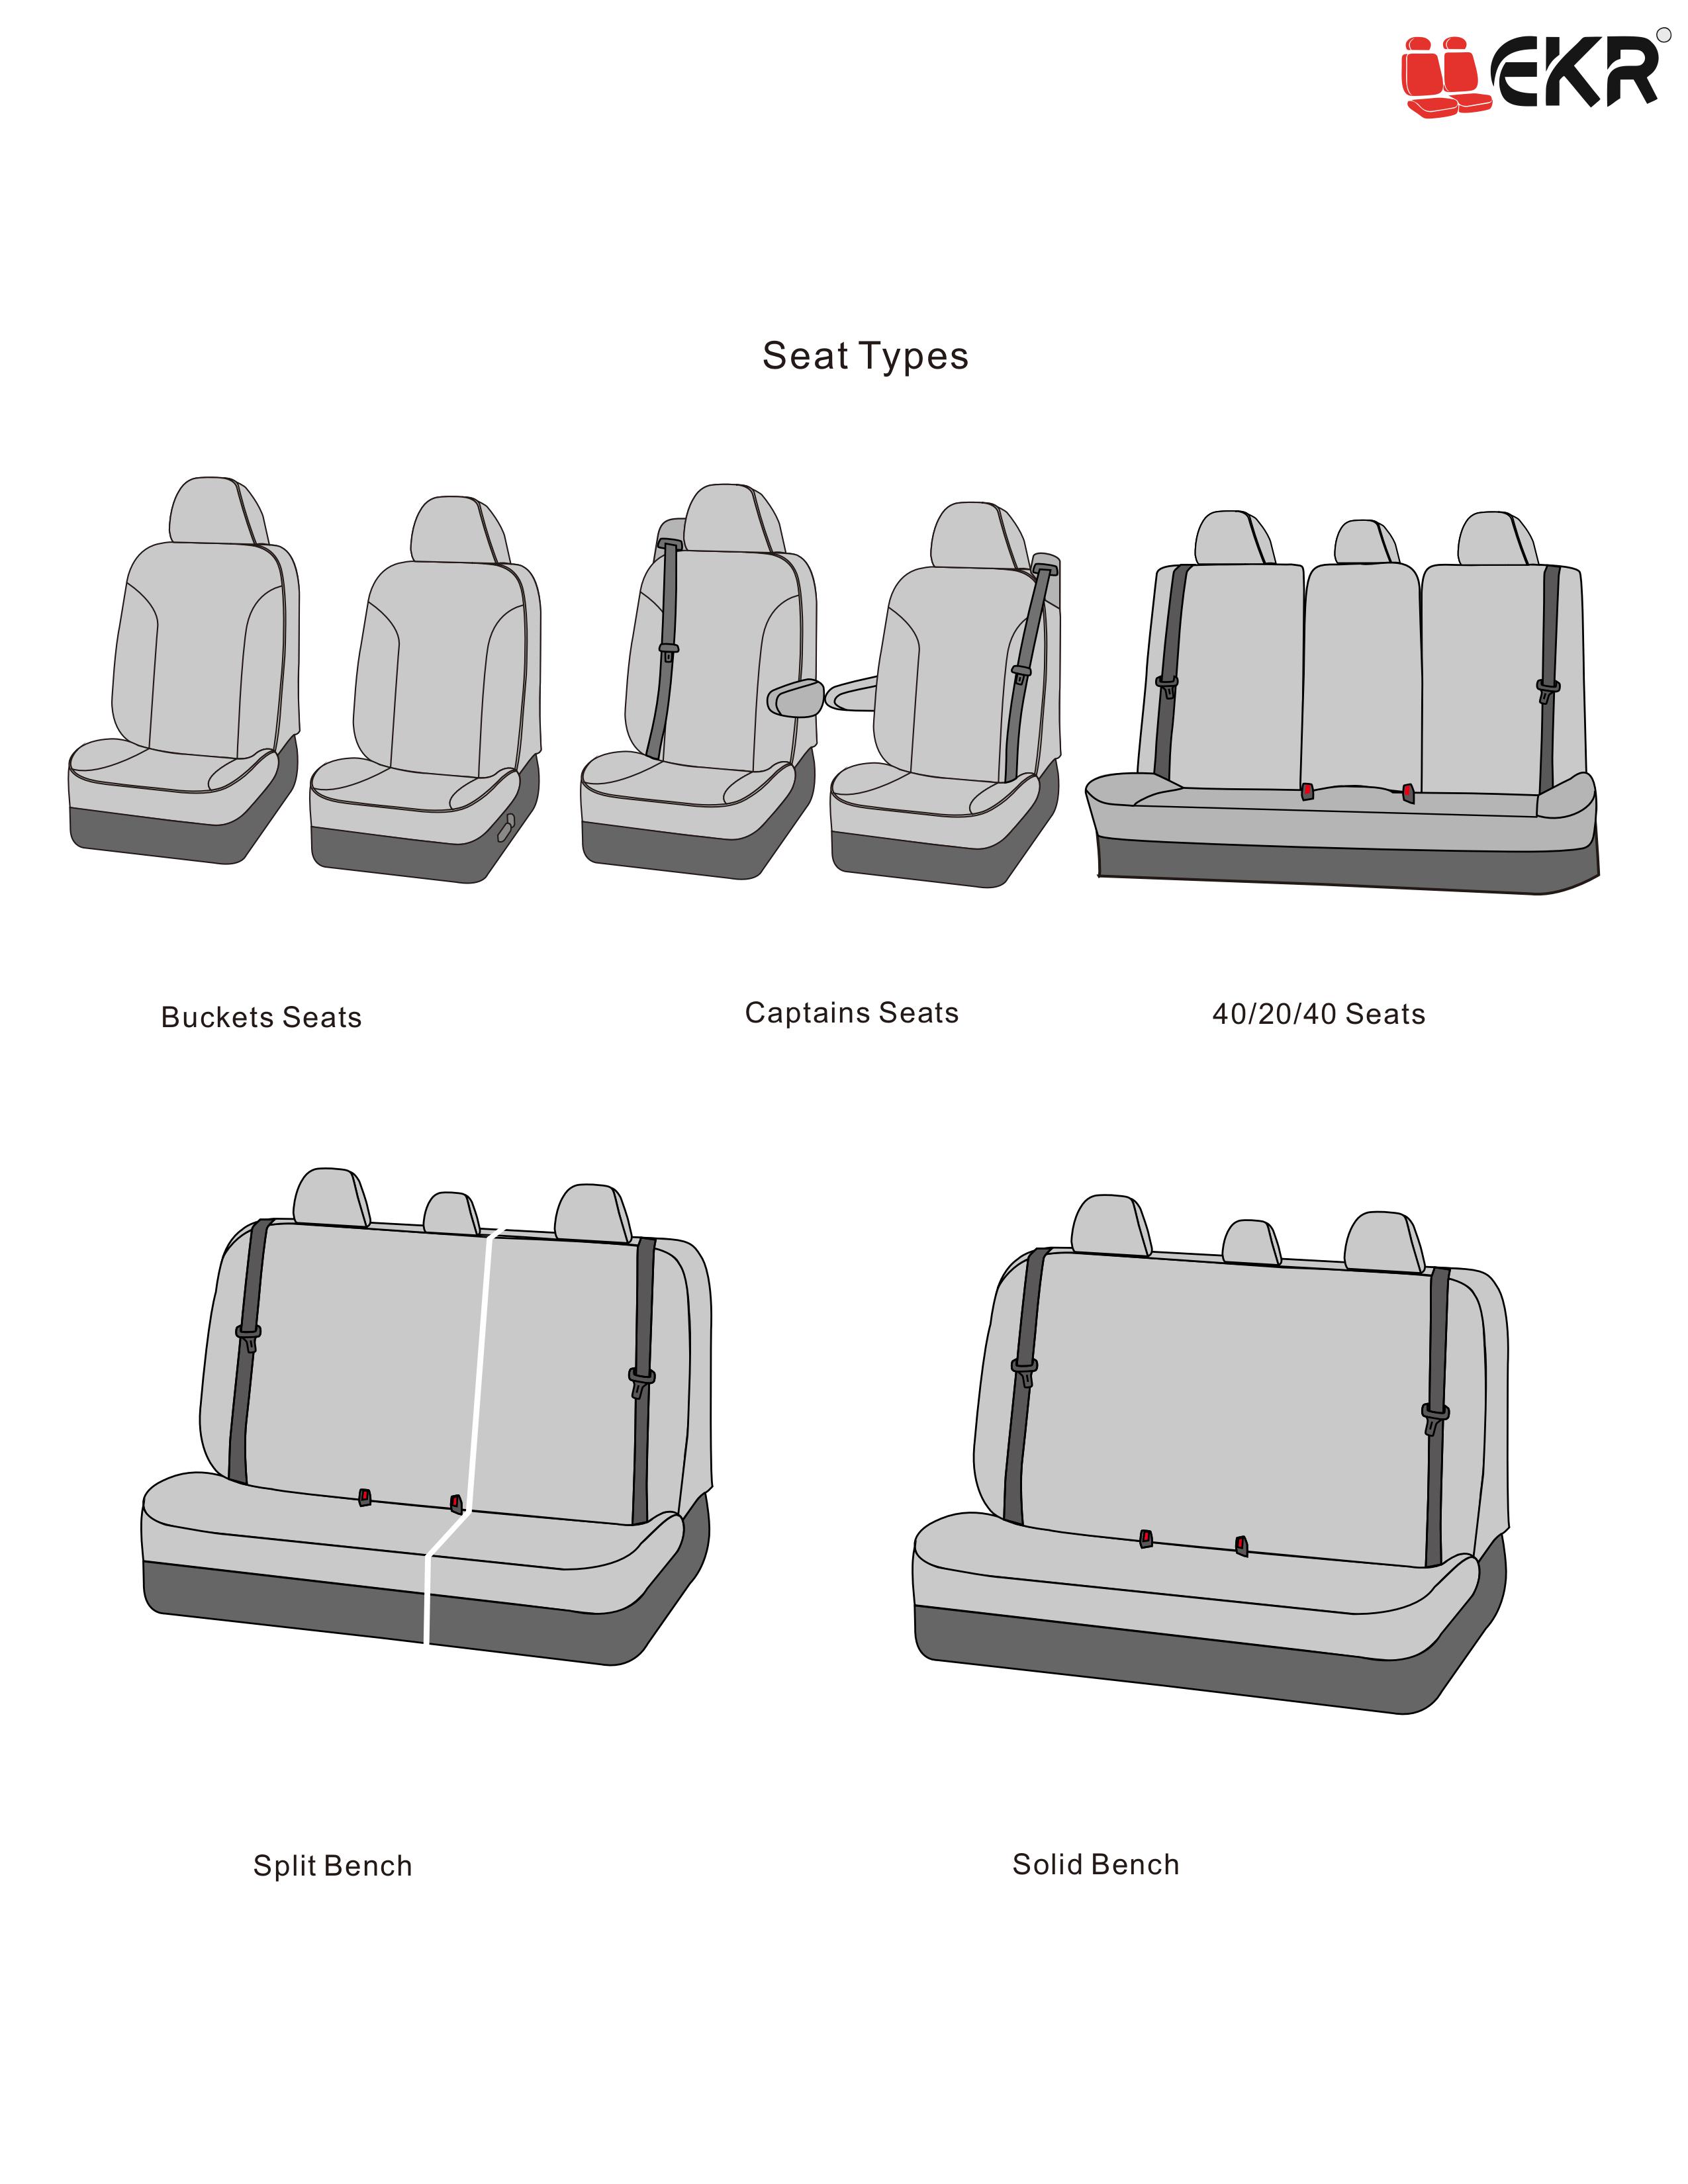
Custom-fit seat covers depend on the structure of the original seats. Before beginning installation, confirm that the product matches the vehicle and seating configuration used when the order was placed.
If the Seat Structure Does Not Match, Stop Before Forcing the Cover
If a seat-cover piece does not appear to correspond to the shape of the seat, first confirm that you are using the correct left, right, front, rear, backrest, or cushion section.
Differences in model year, trim, seat split, headrests, armrests, or factory options can affect fitment.
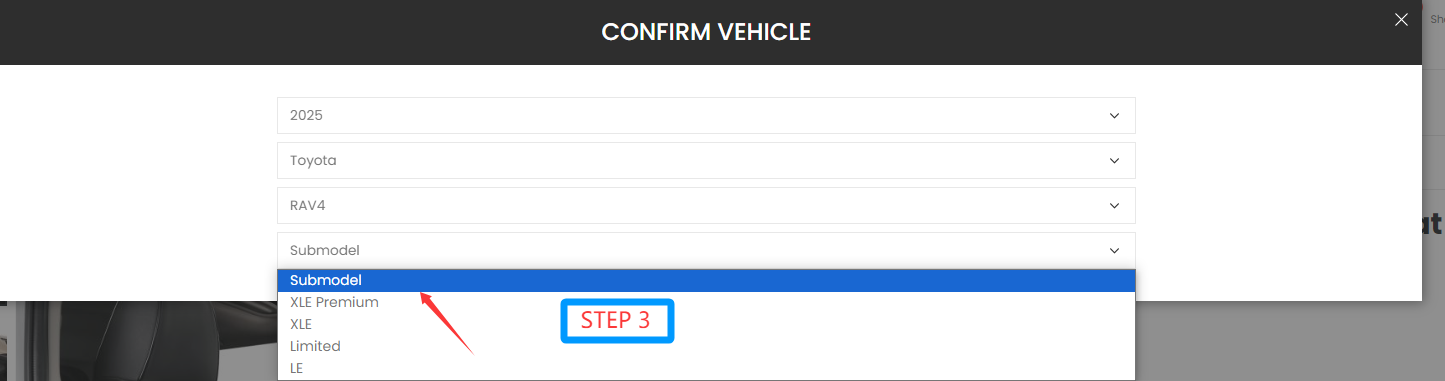
If you are unsure whether the correct vehicle configuration was selected, review our Vehicle Fitment Guide before continuing.
How to Install Custom-Fit Seat Covers
Exact procedures vary by vehicle, but most custom-fit installations follow the same general sequence.
Identify Every Cover Piece
Separate the driver, passenger, rear-seat, headrest, armrest, and applicable center-section pieces. Confirm their orientation before fitting anything to the seat.
Position Before Tightening
Place each cover over the intended seat section and align the primary seams with the original seat contours. Do not fully tighten the cover before it is centered.
Route the Applicable Fasteners
Follow the fastening method supplied for the product. Straps, hooks, buckles, and other fasteners should be routed carefully without crossing moving components.
Align Openings and Factory Features
Check the location of headrests, seat belts, armrests, adjustment controls, child-seat access, and other original features before final tightening.
Apply Final Tension
Once the cover is properly centered, secure the applicable fasteners and smooth the panels so the seams follow the intended seat contours.
Perform a Complete Function Check
Test applicable seat adjustment, reclining, folding, sliding, belt access, armrests, and other original seat functions before regular use.
Front Seat Installation Tips
Front seats often include more controls, wiring, seat rails, and safety-related features, so take extra care when routing the cover and fasteners.
Start With the Backrest
Align the backrest cover with the original seat shape and center the seams before fully securing it.
Fit the Cushion Next
Position the cushion section around the front and side contours, then route the applicable fasteners according to the product design.
Keep Controls Accessible
Do not position material, straps, or fasteners over seat controls or adjustment components.
Keep Seat Rails Clear
Fasteners should not interfere with seat rails, wiring, motors, or other moving components under or beside the seat.
Rear Seat Installation Requires Careful Piece Matching
Rear seats can include split backrests, folding cushions, center armrests, cupholders, headrests, seat-belt openings, and child-seat access points.
Match Each Split Section
Confirm which cover belongs to the left, right, and applicable center section. Similar-looking pieces are not always interchangeable.
Keep Seat Belts Accessible
Make sure required seat-belt buckles and belt access points remain visible and usable.
Check Child-Seat Access
Do not block intended access to applicable child-seat anchor or buckle locations.
Test Folding Sections
After installation, operate applicable folding, reclining, or sliding sections to make sure the cover does not interfere.
Pay Special Attention to Airbags and Original Seat Functions
A seat-cover installation should not focus only on appearance. The finished installation also needs to respect the original seat structure and applicable factory features.
Seat-Mounted Side Airbags
For applicable EKR designs, designated seat-mounted side-airbag areas are constructed around the original airbag location using a dedicated breakaway / weakened seam and specialized airbag stitching.
Do not sew, reinforce, add padding, or otherwise modify a designated airbag seam.
Heated & Ventilated Seats
EKR custom-fit seat covers can be used while retaining factory heating and ventilation functions. Material choice and original seat construction can affect how quickly heat or airflow is perceived.
Controls, Armrests & Seat Movement
After installation, check applicable adjustment controls, headrests, armrests, seat rails, reclining, folding, and sliding functions before regular driving.
Use the Official Manual While You Install
The sections above explain the general installation logic. For the actual hands-on process, keep the official EKR Installation Guide open as you work through each seat-cover component and fastening method.
Open the Official Installation Guide6 Seat Cover Installation Mistakes to Avoid
1. Starting Without Identifying the Pieces
Sort all components first. Installing a similar-looking piece on the wrong seat can create unnecessary fitment problems.
2. Tightening Before Centering
Align the primary seams with the original seat contours before applying final tension.
3. Pulling Too Hard on the Wrong Piece
If a section appears significantly too small or does not match the seat structure, stop and confirm the part and vehicle configuration.
4. Routing Fasteners Around Moving Parts
Keep straps, hooks, and fasteners away from rails, motors, wiring, and adjustment mechanisms.
5. Covering Original Access Points
Check seat belts, child-seat access, controls, armrests, and other required openings.
6. Skipping the Final Function Test
Always test applicable seat movement and original functions after the installation is complete.
What Should You Check After Installation?
A final inspection helps identify alignment or fastening issues before regular use.
| Check | What to Confirm |
|---|---|
| Seam Alignment | Main cover seams follow the intended contours of the original seat. |
| Cover Tension | The material is positioned evenly without obvious twisting or incorrect orientation. |
| Seat Controls | Applicable adjustment controls remain accessible. |
| Seat Movement | Sliding, reclining, folding, or other applicable functions operate normally. |
| Seat Belts | Required buckles and belt access points remain accessible. |
| Child-Seat Access | Applicable anchor and buckle access has not been obstructed. |
| Fasteners | Straps, hooks, and fastening components are secure and clear of moving parts. |
| Airbag Area | Applicable designated airbag areas have not been modified or reinforced. |
Check the Fit Again After the First Few Drives
After sitting in the seats and using the vehicle normally, inspect the covers again. Minor adjustments can help improve alignment after the material has settled into position.
If a section shifts, first review the applicable fastening points rather than simply pulling the visible material tighter.
Prefer to Watch the Installation Process?
Installation videos can help you understand common positioning and fastening techniques, but always compare the video with the actual seat structure and product supplied for your vehicle.
EKR Installation Videos
Visit the official EKR YouTube channel for installation references and product videos.
If a video is not specifically labeled for your exact vehicle configuration, treat it as a general installation reference rather than an exact model-specific procedure.
Need Cleaning or Maintenance Guidance?
Cleaning recommendations depend on the seat-cover material, so maintenance is covered separately from installation.
Seat Cover Care & Maintenance
For material-specific cleaning, routine care, and maintenance guidance, see our dedicated Car Seat Cover Care & Maintenance Guide .
Custom Seat Cover Installation FAQs
Where can I find the official EKR seat cover installation instructions?
Use the official EKR Installation Guide in the EKR Help Center. It is the primary step-by-step reference for the general installation process.
Do all EKR seat covers install the same way?
No. Installation details can vary by vehicle, model year, trim, seat layout, and product configuration. Use the official guide together with the actual structure of your vehicle and seat-cover set.
What should I do if one seat-cover piece does not fit?
Do not force the cover. First check whether the correct piece is being installed on the correct seat and in the correct orientation. Then confirm the vehicle and seat configuration.
Can I install custom-fit seat covers myself?
Many customers install custom-fit seat covers themselves by following the supplied instructions and installation references. The exact level of difficulty can vary by vehicle and seat structure.
Can EKR seat covers be used with heated and ventilated seats?
Yes. EKR custom-fit seat covers can be used while retaining factory heating and ventilation functions. Material choice and original seat construction can affect how quickly heat or airflow is perceived.
Are EKR seat covers designed for seats with side airbags?
For applicable EKR designs, designated seat-mounted side-airbag areas use specialized construction around the original airbag location, including a dedicated breakaway / weakened seam and specialized airbag stitching. Correct vehicle selection and installation are important.
Can I tighten or sew the airbag seam if it looks loose?
No. Do not sew, reinforce, add padding, or otherwise modify a designated airbag seam. Contact EKR if you believe there is an installation or fitment issue in that area.
Why does my seat cover have wrinkles after installation?
First check that the correct piece is installed in the correct orientation. Then review the alignment and fastening points. Some final adjustment may also be needed after all sections are fully secured.
Should I use YouTube videos or the installation manual?
Use the official EKR Installation Guide as the primary reference. Videos are useful as visual supplements, especially for understanding common positioning and fastening techniques.
Ready to Install Your EKR Seat Covers?
Keep the official EKR Installation Guide open while you work, follow the structure of your actual vehicle and seat-cover set, and contact EKR if something does not match before forcing or modifying the product.
How Do I Find the Right Cover?
This blog introduces you to the steps of installing ekrcover car seat covers in detail, providing comprehensive guidance from preparation to installation of each seat, helping you to easily install seat covers for your car and improve the beauty and comfort of the interior.When installing a custom seat cover, first ensure it matches your vehicle's seat model.
Confirming Seat Cover Compatibility
The first step in installing ekrcover car seat covers is to ensure they fit your vehicle perfectly. The diverse range of car models results in varying seat shapes, sizes, and structures, so ensuring the correct fit ensures a smooth installation and optimal performance.
You can confirm compatibility in the following ways:
- Visit our official website: we provide a detailed list of compatible models for each seat cover. Please carefully check your car make, model, and year to ensure an exact match.
- Contact Customer Service: If you have difficulty determining seat cover compatibility on our website, or if your vehicle model is not in our database, please feel free to contact our customer service team. You can use the online customer service function on our website or email our customer service email address to provide your vehicle model information. They will quickly provide accurate fitting recommendations.
- Reference your vehicle manual: Your vehicle manual contains detailed specifications and data for you to use. You can use this to obtain seat information and compare it with the seat cover's compatibility instructions. For example, the instructions may mention the seat's dimensions, whether it has any special adjustment features, etc. This information can help you determine whether the seat cover is suitable.


What should I prepare before installation?
‘Too much workon Installation!!’ — We understand the concern. Let me explain why installation feels more involved, and why it’s intentional.
- First, the fit is precise. We 3D-scan actual vehicles and cut each panel to the exact seat geometry. That means you are aligning seams and securing anchors, not simply draping a cover. The result is an OEM-level appearance rather than a loose overlay.
- Second, the material is real leather. Genuine leather has structure, so it feels firm during installation. That firmness prevents wrinkling and sagging over time, allowing the cover to settle into clean lines and hold its shape.
- Third, the cover is designed to lock in place. Hidden anchors and grip zones are set once so the cover does not shift with daily use. You do the careful setup now, and it remains stable for the long term.
The payoff is daily practicality: liquids bead and wipe away; sweat and stains do not soak in; routine scuffs from keys, buckles, or pet paws are resisted; and comfort remains consistent through summer and winter.
Plan on about hours for the first install. Warm the cabin briefly to make the leather more pliable, align the reference seams, set the anchors in order, and follow our step-by-step guide. One thorough installation yields years of clean, secure, factory-grade seating.”
Preparing Installation Tools
To successfully install your ekrcover car seat cover, it's crucial to have the necessary tools. Your seat cover includes:
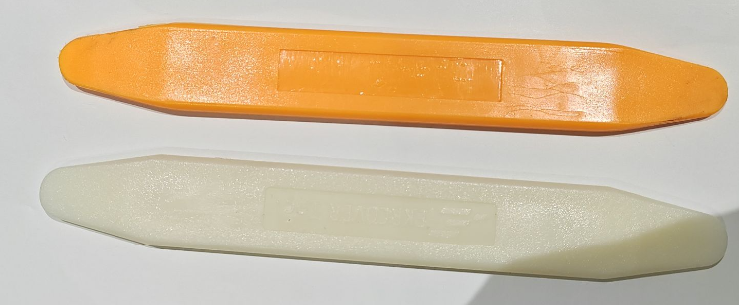
Illustrated manual
A Installation Tool (As shown in the image)
Here are some tools you might need and their uses:
Wrench and screwdriver: If your car seat requires disassembly to install the cover, a wrench and screwdriver will come in handy. For example, some rear seats may require loosening retaining screws. Using the appropriate sized wrench and screwdriver ensures safe and convenient removal and installation. During disassembly, be sure to keep screws and other small parts safe to avoid losing them.
Flashlight: Some nooks and crannies in your car are dimly lit, so a flashlight can provide ample illumination to help you inspect the seat's structure and installation details. For example, at the bottom of the seat cover or in the gap between the rear seats, a flashlight can help you accurately locate the fixing points and ensure the cover is securely installed.
Cleaning cloth and detergent: Before installing seat covers, clean the seat surface. A cleaning cloth and detergent can help remove dust, stains, and grease. When using detergent, dilute and use according to the product instructions to avoid damaging the seat material. After cleaning, wipe the seat dry with a cleaning cloth to ensure the surface is dry and clean.
How Do I Clean My Seat Cover?
Cleaning the Seats
Before installing your ekrcover car seat covers, be sure to thoroughly clean the seats. A clean seat surface not only ensures smooth installation but also extends the life of both the seat and the cover.
Removing Debris: First, remove any debris from the seats, such as documents, beverage bottles, and small ornaments, and set them aside. This step allows you to more thoroughly inspect the condition of the seats and prevents damage to the seat covers during installation.
Vacuuming: Vacuum the seats thoroughly, focusing on removing dust, hair, and debris from the seat surfaces, crevices, and backrests. If your vacuum cleaner comes with different nozzles, choose one suitable for crevices and corners to ensure every corner is cleaned.
Removing Stains: For stains on the seats, choose the appropriate cleaning method based on the type of stain. For general dust and stains, gently wipe with a damp cloth and a small amount of neutral detergent. For example, for stains left by food residue, wipe with a damp cloth and then dry with a clean, dry cloth. For stubborn stains, such as oil or ink, use a specialized car seat cleaner. Before using the cleaner, test it on a small, inconspicuous area of the seat to ensure it won't discolor or damage the seat material. Then, follow the cleaner's instructions: spray the stain, gently scrub with a soft-bristled brush, and finally wipe clean with a damp cloth.
Drying the Seats: After cleaning, let the seats air dry or wipe them dry with a clean towel. Ensure the seats are completely dry before installing the seat covers to prevent moisture from being trapped between the cover and the seat, which can cause mold, odor, and other problems.
We recommend using a 1:7 ratio of cleaner to water (as shown).

How Do I Install My Seat Sovers?
Installation Tutorial
Visit our installation guide on YouTube:Our official account will have video tutorials on installing seat covers for each brand and model. By watching the video, you can have a more intuitive understanding of the installation process and techniques, learn from other users' installation experience, and help solve the installation problems you encounter.
Optional Professional Help & Store installation:Installing seat covers can be difficult for one person, so you can ask family or friends for assistance. For example, when installing rear-row, one-piece seat covers, two people can simultaneously lower the cover from either side. This helps keep the cover flat and allows for a smoother installation. Alternatively, you can seek professional assistance.
Our company is located at 9860 Rush Street, South El Monte, CA 91733 USA. Please call 626-748-2788 in advance for an appointment. (Monday to Saturday, 9:00 AM to 5:30 PM)
Installation fee: Generally, 5 seats are $80 and 7 seats are $100. Charged depending on the seat and the actual situation.
Installation time:Most customers can complete the installation within 1-2 hours.
Installation Inspection: Custom seat covers are designed with every detail of the seat in mind, including the seat cushion, backrest, backrest, and armrests, to ensure a perfect fit. After installation, carefully inspect the seat cover to ensure every detail is intact. For example, check that the cover completely covers the seat and is not uneven or loose. You can also gently press the cover to confirm it is securely in place.
How to deal with odors after installation?
Newly installed car seat covers may have some odor, which is normal. You can effectively remove odors by following these methods:
Airing and drying: Park your car in a well-ventilated area with all doors and windows open to allow fresh air to circulate and remove odors from the seat covers. If conditions permit, you can also remove the seat covers and air them in a well-ventilated area, but be careful to avoid direct sunlight to prevent fading or damage. Airing and drying is a simple and effective method. For mild odors, a few days of airing will usually significantly reduce them.
Using activated carbon: Activated carbon has a strong adsorption capacity and can effectively absorb odor molecules emitted by seat covers. You can place activated carbon bags in your car, such as on the seats and in the trunk. Regularly replace the activated carbon bags to maintain their adsorption effectiveness. Replacing the activated carbon bags regularly will continuously purify the air in your car and remove seat cover odors.
Place fruit peels: Fruit peels like lemons, oranges, and grapefruits have a naturally refreshing aroma, so place some in your car to improve the odor. Placing the peels in a corner or cup holder will not only release a fresh, fruity aroma but also mask any odor from the seat covers. However, be sure to replace the peels promptly to prevent them from rotting and creating new odors.
Use an air purifier: Install an air purifier in your car to filter out odors, dust, and harmful particles, effectively improving the air quality inside your car. Choose an air purifier with high-efficiency filtration and use it correctly according to the instructions. This will help remove seat cover odors more quickly and leave the air in your car fresher.
How Do I Clean Dirty Seat Covers?
The cleaning method for ekrcover seat covers varies depending on the material used. Here are some common cleaning methods and precautions:
Cleaning Frequency: We recommend cleaning your seat covers based on actual use and the degree of soiling. If you frequently use your car, your seat covers are prone to stains, so you may need to clean them every one to two months. If your car is used less frequently and your seat covers are relatively clean, you can extend the cleaning interval.
Cleaning Method:
Fabric seat covers: First, vacuum the surface of the seat cover to remove dust and debris. Then, prepare an appropriate amount of warm water, add neutral detergent, and stir well. Soak the seat cover in the solution for 15-30 minutes to dissolve the stains. For heavily soiled areas, gently scrub with a soft brush, being careful not to apply excessive pressure to avoid damaging the fabric fibers. After scrubbing, rinse the seat cover thoroughly with clean water until no foam remains. Finally, squeeze out the seat cover and air dry in a well-ventilated area, away from direct sunlight.
Leather seat covers: Do not soak directly in water to clean. First, wipe the surface of the seat with a clean, damp cloth to remove dust and stains. Then, use a dedicated leather cleaner and apply it to the seat according to the product instructions. Gently wipe with a soft, dry cloth to remove any remaining stains and detergent. Regularly apply maintenance oil to the leather seat covers to maintain the leather's softness and luster, extending the life of the seat covers.
Plush seat covers: First, comb the lint to keep it smooth, then thoroughly vacuum it. For localized stains, use a dedicated lint cleaner. Spray the cleaner on the stain, gently wipe with a clean, damp cloth, and allow the seat cover to air dry.
Canvas seat covers: Remove dust with a soft brush and allow the area to air out to remove odors. Gently brush stains with a neutral detergent. Sprinkle baking soda on oil stains. Treat sweat stains with cold water. Remove and wash every two to three months, preferably by hand, rubbing gently in cold water and drying in the shade. Avoid harsh detergents, high temperatures, exposure to the sun, and using trimmers for pilling.
Note:
Check the seat cover label: Before washing your seat cover, always check the care label to understand the material and cleaning requirements, and wash it strictly according to the label.
Avoid strong rubbing: When washing easily deformed or damaged materials like silk and suede, be especially gentle. Avoid pulling or rubbing vigorously to prevent deformation or damage.
Control the water temperature: Generally, the water temperature for washing seat covers should be between 30°C and 40°C. Excessively high water temperatures may cause the seat covers to shrink, fade, or deform.
Choose the right detergent: Use a neutral detergent and avoid strong acids or bases, as these can damage the seat cover's fibers and affect its quality and lifespan.
Drying Method: After washing, dry the seat covers in a well-ventilated, cool, and shady area away from direct sunlight to prevent fading and aging.
Every step in the car seat cover installation process is crucial, from confirming the car model, preparing tools, and cleaning the seats, to actually installing the front and rear seat covers, handling special situations, performing post-installation inspections and adjustments, and performing subsequent cleaning and maintenance.
We look forward to your successful car seat cover installation, giving your car a brand new look. If you have any installation tips, or experience resolving problems, please share them with us. Your feedback will not only help other car owners better install their seat covers, but also allow us to continuously improve our products and services.
Also, if you encounter any problems during installation, or have any questions or suggestions about our car seat covers, please feel free to let us know. Your feedback is our driving force. We will do our best to answer your questions and provide assistance, striving to ensure that every customer enjoys high-quality products and a satisfying service experience. Let's create a better car interior together!


The information below is required for social login
Sign In
Create New Account